Banner, Tutorials, Uncategorized, Valentines

Heart Banner 

I LOVE felt……fitting for Valentine’s Day. For this banner I bought several different colors of felt.  I took a marker and drew hearts on the fabric of different sizes but similar.  I then doubled the fabric over (so I could cut two hearts out at once) and cut them out by hand.   After I had them all cut,  I took them to my sewing machine.  Placing one heart after another,  I sewed them together down the middle.   Creating a long line of hearts. 

Uncategorized

Spread the Love…

Valentines day is approaching. One quick decoration is my Holiday Kisses cup. 

Grab a white cup, bowl, or mug. You can get cups like this at Ikea.  Use a silhouette machine or some other vinyl cutting machine and cut your words out in red (or pink).  I like red because I also use this for Christmas!

Fill with the candy of your choice. Maybe….. chocolate kisses!

Happy Valentines Day!

Canning

Homemade Salsa

This was two batches!

This was the first time I have bottled salsa.  I gave a few of the bottles of my homemade salsa away and got great reviews!!!  Overall it was very easy. Thanks to my friend Brinda for the recipe.   A few tips when cutting up:

  1. If you have a food processor use it to chop up everything.
  2. To skin the tomatoes, boil in water for 1 minute, put in cool water and slip off skins.
  3. Once you chop up tomatoes, let them drain in a colander and save the the juice to make minestrone soup later. (I just froze it in a zip lock bag).
  4. I used a variety of tomatoes..you can use whatever ones are available.  I have been told that Romas have less juice.
  5. Always use a Stainless Steel Pot as aluminum will react with the tomatoes.
  6. When cutting jalapenos wear rubber or latex gloves (I double gloved with latex).  Don’t touch anything after cleaning and seeding the jalapenos as it will burn, especially face and eyes.
Okay now that we have the tips, here is the recipe:
20 lbs of tomatoes
28 anaheim peppers (no seeds)
7 jalapenos (1 or 2 with seeds, the rest no seeds)
4 red peppers
4 green peppers
2 huge yellow onions or 4 medium
Seasonings:
2 cups sugar
1 1/2 cups vinegar
1/2 cup lemon juice
1/2 cup salt
Put all your veggies into the pot, add seasonings.  Cook until boiling, but you can cook it as long as you want.  Put into pint jars and process 30 minutes.   I also used quart jars and processed for 45 minutes.  This is a pretty mild salsa.  If you like it hotter add more jalapenos and seeds.
This should make 24 pint jars or 12 quarts (I only got 8 quarts and 4 pints)
ENJOY!!
mom work, stay at home mom, work, work at home, work from home, working mom

Work at Home

If you are looking for a job working from home….this is a great job.  VIPKID!

You teach English online to students in China.  You do need to have some schooling but a teaching degree is not required. It took me about two weeks to interview and train and I was off and teaching.  It was about 3 weeks to get a full week of classes booked.  Let me know if you need any more advice or tips with your interview or when you start teaching!! VIPKID

I have been working with them for over two months.  If you don’t mind some early mornings, which works great for me, you should look into it!  You can also work Weekends (morning and evenings).

Check out my link!

VIPKID

Being Frugal, Painting, Tutorials

Painted Chandelier

 
I am following the trend and painting my chandelier.  Originally I was going to go with a basic color…silver or black.  I found this paint color (Jamaican Sea) and loved it.
 
Before 
 
After


Up close
 
 
I took all the crystal off and painted it using a craft sponge brush.
Let the paint dry and put back the crystal.
That simple!!
 
Check out some more fun Blue things, including this…just click here.

Being Frugal, Kids, Tutorials

Back To School Backpacks


Kids are already in school.  I remember as a child summers going so fast, it hasn’t changed as an adult.  I love that they are in school, but I miss them.
 
For Backpacks this year we went to DownEastHome
 
They have these great canvas backpacks and lunch boxes that are seconds only because a company has made a mistake on monogramming. 
 
 
 EASY FIX:
 
I took some scrap fabric and used my silhouette machine to cut out my kids names and initials.  You have to buy the fabric blade for this, but I love to use fabric so it was a no brainer when I bought it.
 
  1. Iron on interfacing.
  2. Cut out pattern with machine.
  3. Iron on fabric
  4. I hand stitched it to give a little extra strength.
  5. You’re done!

Family Home Evening, Painting, Tutorials

Family Home Evening Chalk Board


FHE Chalk Board
 
 
I have wanted to create this for my family for awhile and finally got around to it.


I found an old piece of wood in our garage from other projects.
 
 
Instructions for chalk board paint:
 
1/2 cup acrylic paint (any color)
 
1 tablespoon un-sanded grout
 
I mixed them together with disposable plastic cup and spoon.  I used a sponge brush to paint with.  Easy clean up.  The paint can dry quickly.  I doubled the batch and painted this piece front and back with two coats and still had some left over for my daughter to paint a smaller board.
 
While the paint dried I used my Silhouette machine to cut out the white vinyl for the lettering.
 
After the paint was dry, I placed my vinyl on the painted surface. 
 
Next take a piece of chalk and rub it all around the painted surface and rub off the excess chalk with a paper towel.  Done!
 
This was so much fun and really took less time then I expected!


Furniture Restoration, Tutorials

Rocking Chair Redo

Wow…it has been awhile since I last posted.  Vacation, sickness and just summer fun has slowed down my posting. 

 I have a fun new project that I recently finished.  I bought this old rocking chair at a yard sale for $15.00.  What a deal.  It did need some work and now it is all done!  Material and padding cost a total of $ 25.00.  So grand total for the new chair (to me) $40.00.


What you need:
 
1. Material of your choice.  I used upholstery fabric
2. Heavy duty stapler and staples
3. Foam square, I used 3 inch thick
4. Board that fits to your chair
5. Quilt batting
6.Hammer


This board was on the rocking chair.  Not in the best of shape, very thin and broken.


Luckily my Husband is pretty handy for me.  He cut out my new shape with some extra wood we had around the house.


I forgot to take pictures before I started.  This was the size of foam I used.  I traced the shape of the wood then used a serrated knife to cut my shape.


Finished shape.
 
 
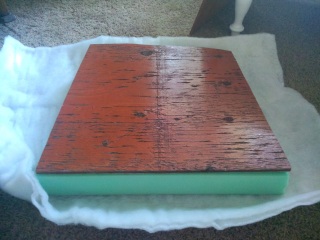
Place foam and wood together.


Lay foam own onto quilt batting.


Pull batting taut on ones side and start stapling (I start on one side in the middle and staple that side.  I then move to the opposite side and staple that side).
 
 
Corners are tricky.  I fold one side across and then pull the other side up and over.
 
 
This creates a clean edge.


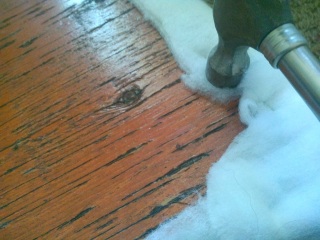
Hammer every staple that you have to make sure it is tight against the wood.


Cut off any excess batting.
 
Almost finished seat.  I didn’t want to leave the wood exposed so I found some extra material to staple on the bottom.  With little kids crawling under things I wanted to avoid slivers.


I stapled this material and cut off excess then hammered nails once again.


For the finish material I folded the ends under to have a cleaner look.  Same steps as the batting.  Start on one side in the middle and then move to the right and left stapling. Then go to the opposite side.   I also had to cut off excess fabric along the corners.  It also helps to have an extra pair of hands.  My husband would pull taut and I would staple has he held.


Underside of finished seat.
 
 
My finished rocking chair!


Furniture Restoration, Tutorials

Furniture Restoration Part 2

Remember the Before….it’s starting to look better.  If you want to refer back to part 1 click here.


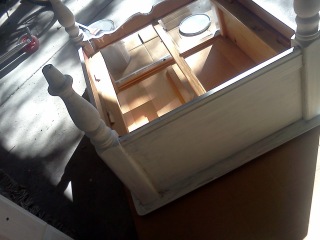
I need to remember to take pictures.  I had already put two coats of Primer on and waited a couple of days before I started to paint.  I started with my painting and remembered I needed to take pictures of the primed paint job.  (I will give all the information of products I used below).  


I had started painting and it was already turned over and I couldn’t turn it over again because of the wet paint.  But above is the primed portion.


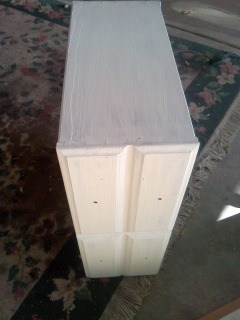
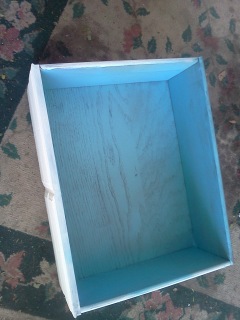
Primed drawer


I wanted to add some color, so I spray painted the inside of the drawer after I primed and before I painted. 


Above: This has been primed twice and painted once.  I got a little paint on the stained top portion and I will go over what I did if you keep reading!


The painted drawer.


Close up of the paint on the stained top.  I need to be better about touching already done surfaces with my hands for support while I paint.


Not the best picture, but this is after I sanded the painted areas on the top and the sides where the tape didn’t do so great of a job.


After I sanded the top, I re-stained.  I didn’t worry about getting on the white paint because I had a baby wipe handy.  I simple wiped it off.


The wiped clean edge.
 
What I used
 
Stain:
Min Wax Dark Walnut Stain
 
 
Primer:
Zinsser Oil Primer
Zinsser Gallon Interior Oil Primer
 
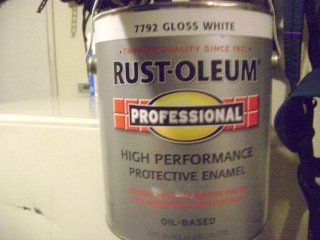
Paint:
Rust-Oleum Oil Gloss White
 
 
Spray Paint for Drawer:
Krylon Island Splash
 
Krylon Island Splash Indoor/Outdoor Satin Spray
 
Of course you will need Paint brushes and for the oil a paint thinner to clean the brushes if you want to keep them.
 
 
Part 3 The finished product will be coming soon!!!